
Instagram Effect Builder: How to Create and Publish Effects
Instagram Effect Builder lets you turn a visual idea into an AI effect that other people can use in Stories. Describe the look, refine the previews, then submit your effect for review. Once approved, people can apply it to their own photos, with your handle attached. Here’s how to create and publish one, help your audience try it, and understand what it can do for your account.
What is Instagram Effect Builder?
Effect Builder is Instagram’s web tool for creating AI Restyle effects for Stories. You describe a visual treatment, such as soft film grain or a watercolor finish, and Meta AI generates an effect. You can publish that look for other people to apply to their own photos. No coding or design experience is required. [1] [2]
The useful part is the reuse: someone can discover your effect in Stories, try it on a photo of their own, and share a Story that carries your handle. Instagram links the effect back to your profile, giving viewers a way to find the creator behind the look. [1]
Creating and publishing effects is free. At launch, you must be in the US, be 18 or older, and have an Instagram account in good standing. People using a published effect must also be 18 or older and in the US. [1] [2]
Create your first effect
Start with a look you would want to use across your own Stories. A creator who shares studio updates might choose warm light and subtle grain; an illustrator might prefer a soft sketch treatment. That gives you a direction to describe when you open the editor.
- Open Effect Builder in your browser and log in with your Instagram account.
- Describe the look in the prompt box, then click Create. Instagram recommends describing the treatment applied to a photo: its color palette, lighting, art style or mood.
- Review the previews. Meta AI starts with four sample photos in the editor. Add more prompts to adjust the effect until the look feels right for your content. [2]
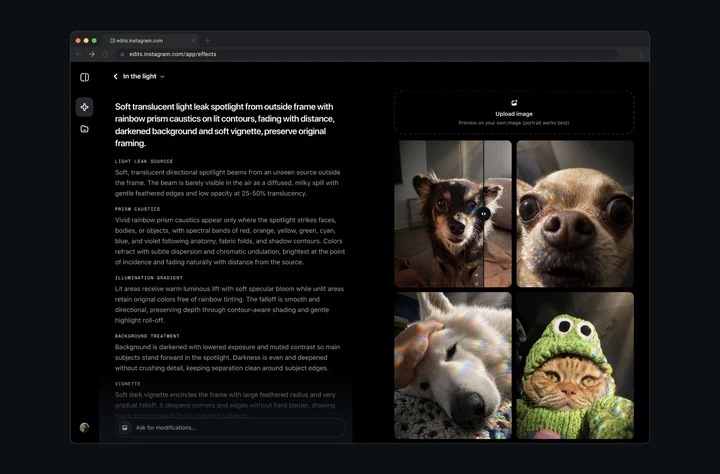
You can also add a visual reference. Click Style reference in the homepage prompt box and upload a photo. Meta AI uses elements such as its color, lighting and texture to guide the effect. [2]
Suggested prompts for your first effect
Choose the row closest to the look you want, then change the colors or intensity to suit your content. These are starting points you can adapt in the editor.
| Creative goal | Suggested prompt |
|---|---|
| Warm studio updates | Add soft amber lighting, muted colors and fine film grain. Keep the treatment subtle and the main subject clear. |
| An illustrated travel diary | Give the photo a light watercolor finish with pale blue and peach tones, soft edges and a gentle paper texture. |
| A vivid night-out look | Add violet and blue prism highlights with rich shadows. Use a soft glow while keeping the main subject visible. |
Scroll horizontally to read all columns.
If the first preview feels too strong, ask for a specific adjustment, such as “Reduce the glow and keep the original colors more visible.” A focused follow-up gives you a clearer next version than starting again with a completely different style.
Publish your effect and follow the review
When you’re happy with the effect, add a title, choose a cover image, and click Publish. The title appears beside your Instagram handle in Stories, so choose a name that helps people recognize the look. [2]
Publish submits the effect for review. It becomes available to other people after approval. Instagram says you will receive an email when the review is complete, and that review can take up to 24 hours. [1] [2]
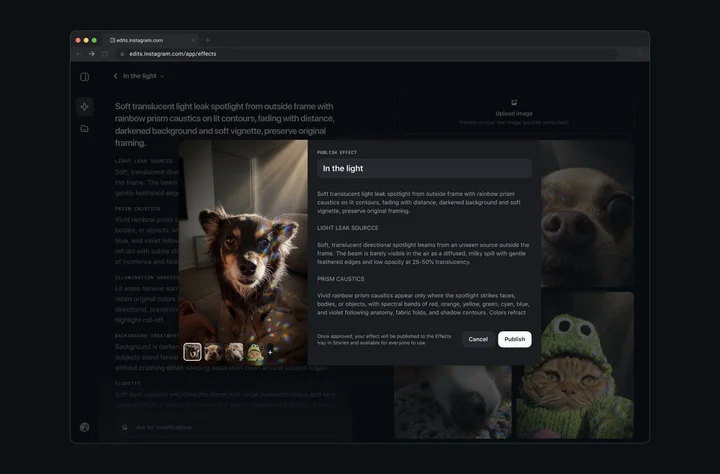
You can follow its progress in the Library tab:
- In review: it has not been published yet.
- Published: it is live and available for eligible people to use.
- Rejected: it did not meet Instagram’s policies. [2]
If it is rejected, revisit the prompt, title and any uploaded reference image. Instagram lists references to brands or logos, copyrighted characters or artwork, recognizable real people, and content that breaks Community Standards among common reasons an effect is not published. [2]
To revise and resubmit, open Library, select the effect, then choose Menu → Make a Copy. Adjust the copy before submitting it again. [2]
How other people use your effect
Once approved, your effect appears among the Restyle options in Instagram Stories. You can find your own published effects under My effects and use one in a Story to introduce it to your audience. [1] [2]
For someone who sees that Story, the path is straightforward:
- Tap the effect on the Story to open it.
- Choose Try it and apply the effect to a photo of their own.
- Share the photo to their Stories with the effect applied. [1] [2]
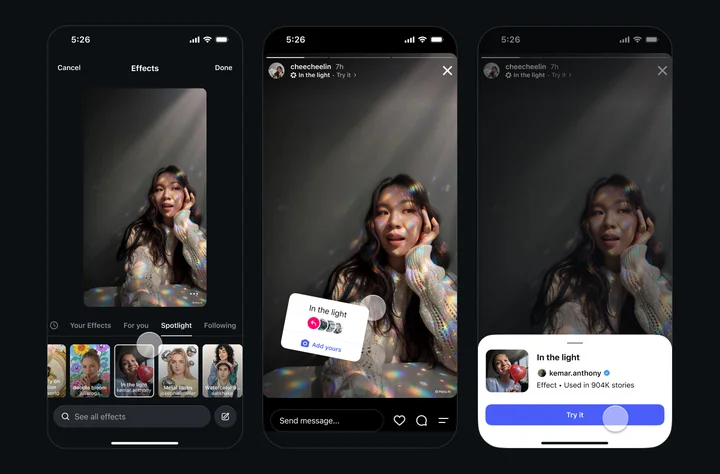
People can also discover it while browsing effects in Restyle. Your handle stays on the effect when someone shares a Story using it, and viewers can tap through to your profile. Each use gives someone else a way to find both the look and its creator. [1] [2]
When you share your first example, give people a reason to join in. For a travel diary effect, you might invite them to use it on a favorite photo from their weekend. Show the look in your own Story and tell them where to tap to try it.
What Effect Builder offers creators
For creators with a recognizable visual style, Effect Builder makes that style something an audience can use. You could carry a familiar film look across a recurring Story series, or give your community a shared treatment for photos around an event. Followers contribute their own photos while keeping a visual connection to your work.
The discovery opportunity comes from attribution. Your handle travels with the effect, and the profile link gives interested viewers somewhere to go next. That creates another route to your account; it does not guarantee new followers, more reach or income. [1]
Start by sharing a Story made with your effect. Instagram recommends this as a way to help people discover it. Its Help Center also says effect suggestions consider factors such as how often an effect is used and how people interact with Stories made with it. [2]
To see whether people are picking it up, open Library and select a published effect. Insights include how many people it reached and how many times it was used. Allow a few hours for those numbers to update before drawing conclusions. [2]
A useful first question is whether people want to use the look in their own Stories. If they do, you have made something your community can participate in. If you are deciding where AI belongs in your broader workflow, our guide to which parts of content creation AI should handle can help you choose what to delegate while keeping the creative direction yours.
Sources
Based on Instagram’s announcement and Help Center instructions, checked on November 11, 2026. Suggested prompts and audience invitations are Kabo’s editorial examples. Images are official Instagram demonstrations reproduced to illustrate the corresponding steps; they are not Kabo test results.
- Edits: Introducing Effect Builder: November 9 launch announcement, free creation and publishing, Stories sharing and creator attribution.
- Instagram Help Center: About Effect Builder: eligibility, editor steps, review and resubmission, effect discovery and insights.